Introduction
A regular user’s first experience with Admin By Request is likely to be the little black (or white, depending on display settings) icon in the menu bar. Or perhaps they have already tried to carry out a task that they were able to complete successfully yesterday, but now there’s a pop-up message advising them that the task requires administrator access, which must be approved before the task can proceed.
Either way, there is a new app on the desktop that users must learn to work with. The Admin By Request app is pretty simple and very intuitive, but, if it’s new, it still needs explaining so users can get the best out of it and maximize their productivity.
This blog dives deeply into the Admin By Request user interface for the macOS and Linux endpoint clients; the app as it appears on screen, including its windows, menus, buttons, links, explanatory text and anything else that might display at one time or another while in the hands of macOS or Linux users.
Since this blog covers both macOS and Linux clients, we also compare the two, highlighting the differences between them.
NOTE: The endpoint client versions described inn this blog are macOS v4.2.2 and Linux v3.0.13.
IT Admins, This One’s for You
The blog is aimed at IT administrators responsible for installing and managing Admin By Request endpoint clients, so that they might more easily provide training to their users and minimize inbound support calls.
About the User Interface
Once installed, Admin By Request is running in the background for as long as the endpoint is powered-on. It monitors the actions taken by users, allowing non-privileged tasks to run freely, and intercepting those that require elevated privileges while it checks predefined global settings that govern what is (and is not) allowed by the user running the task.
macOS
The user interface is graphical and is accessed via the icon menu in the menu bar (top right) of the screen.
The color of the icon depends on the currently logged-in user: if the user is an administrator, the icon is red, whereas if the user is a standard user, the tray icon is black:

Click the icon to display the menu and select About Admin By Request for further information (Administrator and Standard User) or Request Administrator Access to carry out an admin task (Standard User only):

Linux
The user interface is graphical and is accessed via the icon menu in the menu bar (top right) of the screen:

Click the icon to display the menu and select About Admin By Request for further information:

App Panels
Selecting About Admin By Request from the menu bar launches the app and displays the home screen, which is a simple window panel with buttons down the left-hand side. The default panel is shown when the app opens or when the top button, About, is clicked.
Panels (macOS)
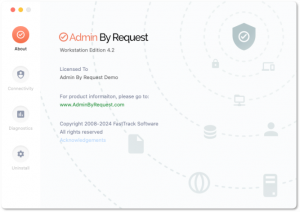
- About – shows the current workstation edition, license details, website link, and copyright information.
- Connectivity – displays the current operational status of the Admin By Request system, including Internet and Cloud connectivity, and details about the current client build version, workstation name and user name.
- Diagnostics – provides a way to send useful diagnostic data on this workstation to the ABR support team.
- Uninstall – enables users to uninstall Admin By Request from this workstation with the help of a portal administrator.
Panels (Linux)
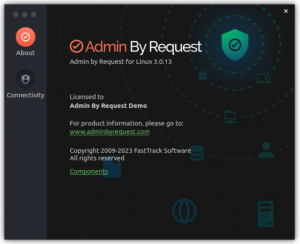
- About – displays the About panel, including current workstation edition, license details, website link, and copyright information.
- Connectivity – displays the current operational status of the Admin By Request system, including Internet and Cloud connectivity, and details about the current workstation and user.
- Components – displays information about the individual modules that make up Admin By Request. Accessed from the About Admin By Request panel, which includes a link to Components.
The modularized architecture means components (or modules) can be updated as required via Linux package management with minimal impact on other parts of the system. This information can be useful should the need arise during troubleshooting.
The following screenshot shows module versions associated with version 3.0.13. There are six modules – the first shown is the default when clicking link Components. Simply click the other modules to reveal their details:
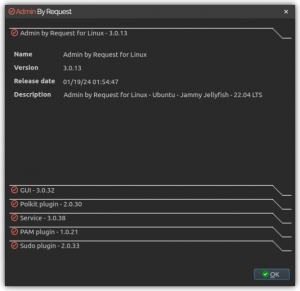
- Admin By Request for Linux – The main module for logic and functionality carried out by the application. This module also supplies the version number of the Linux client that is installed.
- GUI – User interface front-end, supporting both Gnome and KDE desktop environments.
- Polkit plugin – A plugin for integrating application functionality into the Polkit security subsystem.
- Service – The local service for the Admin By Request Linux client.
- PAM plugin – Privileged Access Management plugin, integrating application functionality into the PAM security subsystem.
- Sudo plugin – A plugin for integrating application functionality into the sudo security subsystem.
Connecting via a Proxy Server
IMPORTANT: The Proxy Server functionality described here is for Linux clients only – it is not yet available for macOS clients.
Endpoints can be configured to route privilege requests through a proxy server, which works transparently with Admin By Request.
If the user does have a proxy server enabled, its configuration is passed to the underlying service that will in turn use this proxy for cloud service communications. The proxy traffic uses NO-AUTH (no credentials) and will be seen as the computer account generating the traffic.
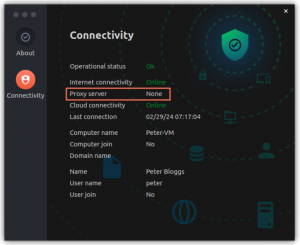
The Connectivity panel indicates whether or not a proxy server is used for an endpoint:
Ports and IP addresses
Admin By Request uses port 443 and the IP addresses and URLs that need access through firewalls are as follows.
If your data is located in Europe:
- IP: 104.45.17.196
- DNS: macapi1.adminbyrequest.com
- DNS: linuxapi1.adminbyrequest.com
If your data is located in the USA:
- IP: 137.117.73.20
- DNS: macapi2.adminbyrequest.com
- DNS: linuxapi2.adminbyrequest.com
When the endpoint starts up, Admin By Request checks to see if it can connect directly to its host cloud server. If it can, then no proxy server is required and the value of Proxy server will be None.
If it cannot connect directly, it checks the following configuration file and works through the listed servers one by one until a connection is possible:
/etc/abr/configurations.d/proxy.conf.templateThe default entries in this file are listed below. If you need to configure a proxy server, replace the information in this file with your proxy server information.
{
    "proxy":
    [
        {
            "type": "HTTPS",
            "hostname": "my-proxy-01.anyone.com",
            "port": 8080
        },
        {
            "type": "HTTPS",
            "hostname": "my-proxy-02.anyone.com",
            "port": 8080
        }
    ],
}
If the endpoint connects via a server configured in this file, None is replaced by the hostname of the proxy server and all privilege requests are routed through it.
Refer to How We Handle Your Data for more information.
Submitting Diagnostics
IMPORTANT: The Submit Diagnostics functionality described here is for macOS clients only – it is not yet available for Linux clients.
Diagnostic information is available on each endpoint that has Admin By Request installed. The details recorded help IT administrators and the Admin By Request support team to troubleshoot issues that might be occurring.
The following data is recorded and submitted:
- Current system configuration
- Errors from the system log
- Admin By Request-related crash logs
- Admin By Request service log
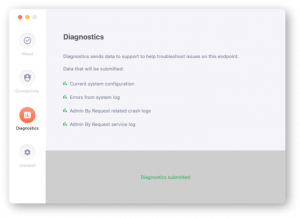
To send diagnostic information about how Admin By Request is running on this workstation, select the Diagnostics button on the About Admin By Request panel and click Submit Diagnostics Data.
The button changes to text Diagnostics submitted, indicating that diagnostics have been sent for analysis:
NOTE: It’s a good idea to submit diagnostics when raising a support ticket for a new issue. The Admin By Request support team will frequently ask for diagnostics when responding to tickets if the information is not already available.
Uninstalling via PIN Code
IMPORTANT: The Uninstalling via PIN Code functionality described here is for macOS clients only – it is not yet available for Linux clients.
Offline users can obtain a challenge/response PIN, which allows the user to perform tasks requiring elevated privileges. A PIN Code can also be used to uninstall Admin By Request when online and this is the purpose of the Uninstall panel in the About Admin By Request window.
The first few steps in this procedure require access to the portal.
- In the Admin By Request portal, navigate to the Inventory page and identify the device on which to perform the uninstall.
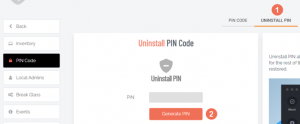
- Locate the device in the inventory list – in the PIN column, click PIN for that device (columns can be switched around – the PIN column in your portal might not be the right-most column).
- Click tab UNINSTALL PIN and then click button Generate PIN.
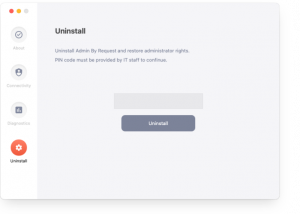
- Back on the device on which you want to uninstall Admin By Request, select the Admin By Request icon from the top menu bar and click About Admin By Request.
- In the Uninstall window, select Uninstall from the left button group, enter the PIN copied from the Portal, and click Uninstall:

Conclusion
Although the Admin By Request app is very easy to navigate, a little explanation goes a long way and users will feel much more comfortable if their expectations are set correctly. This blog explains in some detail what the macOS and Linux apps can do and how their respective user interfaces work. Use it to train your users and provide them with the best possible start to working with Admin By Request.
Admin By Request is available for download at no charge for up to 25 endpoints and 10 servers – download the Admin By Request Free Plan today or book a demo – no strings attached!

