Local administrator accounts
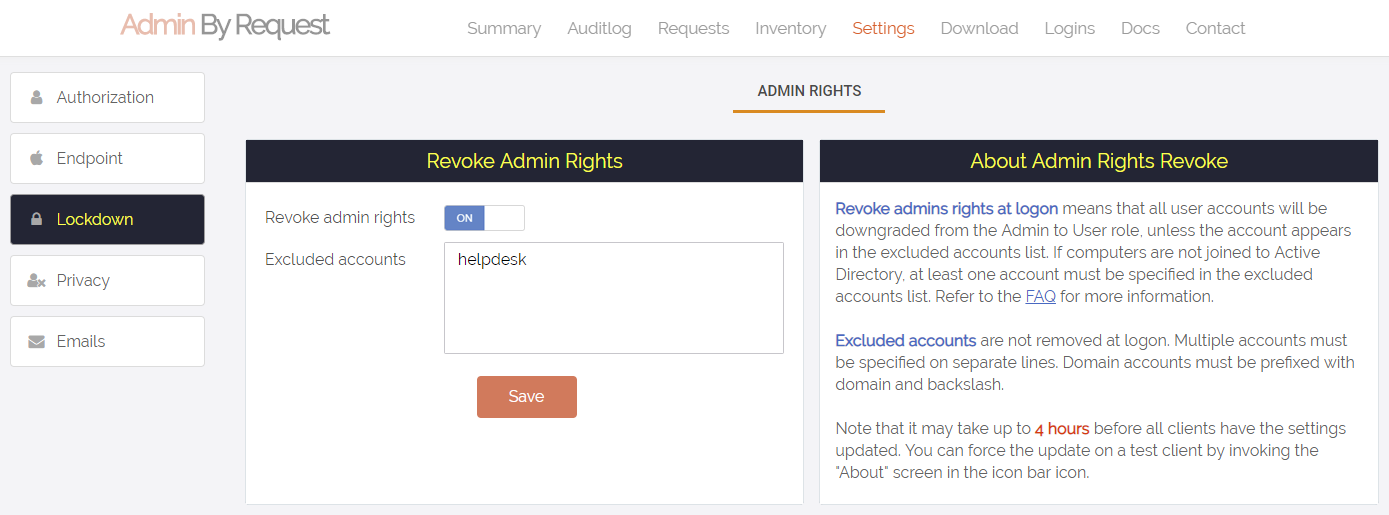
By default, users logging into a Mac are not downgraded from administrator to user, unless the setting "Revoke admin rights" is enabled in the portal
and the user is not in the excluded accounts list. The reason all users are not just downgraded right away is because you may have service accounts
that you have forgotten to list in the excluded accounts list. Also, if someone cleared the excluded accounts list and saved by mistake, the result
would be catastrophic.
Last Admin Check
If the Mac is not bound to an Active Directory, a feature called Last Admin Check kicks in. The purpose of the Last Admin Check is to ensure that
you always have at least one administrator account left. If you log in as the last admin, a notice about this will be displayed when clicking the menubar icon.
If the Mac is bound to Active Directory, this check is not necessary, as you can always log in with a domain administrator.
If you have other system software to manage the Mac and want all administrators to be downgraded at log on, then it is possible to disable the feature.
Please refer to LastAdminCheck on the
Mac policies page.
Active Directory
If a Mac is bound to an Active Directory, all local admin users will be downgraded unless listed in the excluded accounts setting. Admin By Request respects
any group defined in the Directory Utility under "Allow administration by" and will not downgrade these users.

If no administrator groups are defined, the client will automatically grant administrator rights to users member of the default Active Directory "Domain Admins" group.
This is to prevent machines from ending up with no administrator accounts, if the Active Directory binding is now setup correctly.
Subsettings
The portal has two levels of settings for mac users. Mac Settings apply to all users by default, unless overridden under Mac Sub Settings. With sub settings, you can define
special settings based on Active Directory computer or user groups and/or Organizational Unit(s). This can be used to allow sudo access for developers or automatically
approve requests from users in the IT department. This feature is only available if the mac is bound to an Active Directory or using NoMAD or Idaptive.
NoMAD
If a machine is using NoMAD Login and sub settings are defined, users will be asked to login with their Active Directory credentials. This is because the concept of
NoMAD is to avoid binding the Mac to an Active Directory and therefore the user need to log in to Admin By Request for the endpoint software to be able to get the
groups and OUs needs to login and fetch the groups and Organizational Units to be able to determine subsettings. If you have not used subsettings at all in the portal,
the login to Admin By Request will not appear.
Idaptive (formerly Centrify)
Idaptive support is currently under development and will work similar to NoMAD.
Admbyreq user group
During installation of the endpoint software, an administrator group called "admbyreq" is created and assigned all the rights required for installing software and managing
system preferences via the Authorization Database. All local and domain administrators are automatically assigned to this group via the normal system admin group.
This is the group that users are added to when elevated to administrator by Admin By Request.
Sudo
For security reasons, sudo access is disabled during administrator sessions by default. This can be enabled in the settings or a policy file (see
Mac policies).
We do not recommend enabling sudo access unless absolutely necessary. Admin By Requests has checks in place to prevent system tampering using sudo, but due to the root-level
access, it is impossible to fully protect against tampering using sudo.
Consider using the build-in /etc/sudoers file, if only certain commands needs to be run with sudo. The Admin By Request sudo settings will not override normal /etc/sudoers settings.
System extension
Admin By Request does
not require any system extensions, unless you enable Application Blocking feature introduced in version 3.2.
If you use Application Blocking or the App Store blocking, the kernal extension has to be pre-approved usign the following data:
| Team ID: | AU2ALARPUP |
| Bundle ID: | com.fasttracksoftware.adminbyrequest.extension |
You can verify that the system extension is installed in the inventory. Under "System Information" in the client inventory details,
there is an entry that shows, wether the system extension is installed or not.
Machine settings
You can use a local policy file to override all portal settings locally. Refer to
Mac policies for more information.
Any setting defined in the policy file will override both default and sub settings. The policy file is locked during an Admin By Request administrator session, so users are unable
to tamper policy settings.
Tampering
To prevent tampering Admin By Request, it monitors all important files during an administrator session.
And by default, sudo access is disabled to prevent calling system critical tools and user management from the terminal.
The service does also monitor users and groups during the session to prevent tampering, if sudo access is enabled. If Admin By Requests detects that the clock has been changed,
the administrator session will be ended instantly to prevent users from extending their session.
Uninstall
To remove Admin By Request, run this file:
/Library/adminbyrequest/uninstall
The command must be run as a local or domain administrator. It cannot be run during a Admin By Request administrator session.
Uninstalling will remove Admin By Request files, the abrbyreq group, and reset the Authorization Database.
Log files
The service logs helpful information like software version, detected Active Directory settings, admin downgrades, and similar changes to:
/var/log/adminbyrequest.log
The log folder is hidden by default, but can be accessed by using cmd+shift+g in Finder.app and entering /var/log. The log can also be read using Console.app.
Questions?
If you have questions not answered on this page, please contact us using the chat or the contact menu at the top.
LATEST CYBERSECURITY BLOGS